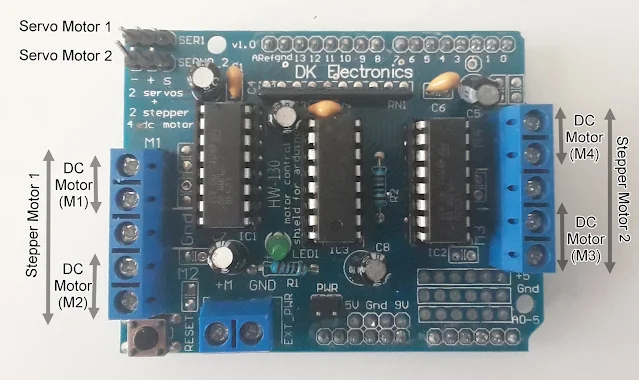
Servo motors are useful in robotics and mechatronics projects and a motor shield is helpful in running various kinds of motors. In this tutorial, you will learn how to control a Hobby Servo motor using L293D Motor Shield and Arduino.
In the previous tutorials we showed you how you can control a DC motor using L293D Motor Shield and how you can control a Stepper Motor using L293D Motor Shield. Much about the motor shield was already mentioned there so you can read more on there as well.
Interfacing Servo Motor with Motor Shield and Arduino
Interfacing Servo Motor with the L293D motor shield is very simple, just connect the three pins of the Servo motor to either the Servo Motor 1 or Servo Motor 2 labelled ports on the shield. In the following picture, a servo is connected to the Servo Motor 1 port.
Servo Motor
A standard servo motor has 3 pins- ground, +5V and signal pin. Shown below is a simple Hobby Servo.
L293D Motor Shield
The L293D motor shield has two ports for connecting two Servo Motors- Servo Motor 1 and Servo motor 2. Besides the power supply pin(Vcc and GND), the signal pins used for Servo Motor 1 and Servo motor 2 are pin 9 and pin 10 of the Arduino UNO. When the shield is attached to the Arduino UNO, the servo signal pins gets connected to these pins.
Programming Arduino for Servo motor control using Motor Shield
For programming servo motor we can use the Servo library that comes with Arduino IDE installation. So unlike for controlling stepper motor or DC motor we do not need the Adafruit motor library.
Steps to program Servo motor are:
1. Use the Servo library
#include <Servo.h>
at the top of the Sketch or program
2. Create a Servo object using the Servo class
eg. Servo myservo;
where myservo is instantiated object of class Servo
3. Use methods
Depending upon what you want to do with the servo motor, you can use different available methods. The attach() method is mandatory and should be declared in the setup() function in the program code.
a. Attach Servo Object
eg. myservo.attach(9);
where attach() is a method which can accepts 3 parameters. The first parameter is the pin number which in above example is 9. The other two are optional and are the minimum and maximum pulse width in microseconds corresponding to 0 degree angle and 180 degree angle. If you don't specify the min and max values then the default values 544 and 2400 microseconds are used.
eg. myservo.attach(9, 550, 2350);
b. Detach Servo Motor
eg. myservo.detach()
the detach() method is used to disconnect the servo motor object from the pwm pin to which it is connected. Once disconnected the pwm pin can be used for other works.
c. attached()
eg. myservo.attached()
the attached() method is used to check whether the servo object is attached to any pins. It returns TRUE or FALSE depending upon whether the variable servo object is attached or not attached to any pins.
d.write() method
eg. myservo.write(80)
the write() method is used to control the positioning of the servo shaft by providing angle value to the method. In the above example, angle in degree of 80 has been specified so the servo will rotate to that orientation. The angle value can be from 0 to 180.
e. writeMicroseconds() method
eg. myservo.writeMicroseconds(1000)
the writeMicroseconds() methods is used to rotate the servo motor shaft to specified orientation by providing microseconds value. In the above example, 1000 microseconds is specified, so the motor shaft will rotate to the position corresponding to 1000 microseconds. On standard servo, 1000 microseconds, 1500 microseconds and 2000 microseconds corresponds to fully counter clockwise, midway and fully clockwise rotation angle.
f. read() method
eg. myservo.read()
the read() method returns the current value of angle of the servo which is the last value passed to the write() method.
Example Program Code for Servo Control using Motor Shield and Arduino
The following is an example code that rotates a Servo motor from 0 to 180 degrees and from 180 degrees back to 0 degree.
#include <Servo.h>


Servo myservo;  // create servo object to control a servo
const int servoPin = 10;
int pos = 0;  // variable to store the servo position


void setup(){
  // attaches the servo on pin 10 to the servo object
  myservo.attach(servoPin);
}


void loop(){
  // sweeps from 0 degrees to 180 degrees
  for(pos = 0; pos <= 180; pos += 1){
    myservo.write(pos);
    delay(15);
  }

  // sweeps from 180 degrees to 0 degrees
  for(pos = 180; pos>=0; pos-=1){
    myservo.write(pos);
    delay(15);
  }
}
Video Demonstration
Below video shows how the Servo motor control using Motor Shield and Arduino works.


