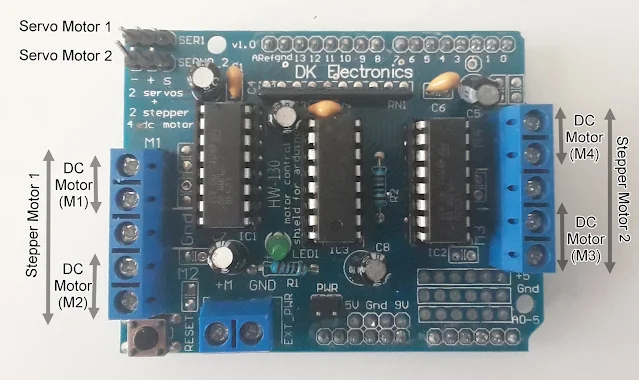
Servo motors are indispensable components in robotics and mechatronics projects due to their precise control and reliability. To simplify motor integration, the L293D Motor Shield is a versatile and efficient tool for interfacing with various motors. This tutorial will guide you through the process of controlling a Hobby Servo Motor using an L293D Motor Shield and Arduino, covering connections, programming, and practical implementation.
Understanding the Components
Servo Motor
A standard servo motor consists of three pins:
- Ground (GND)
- Power Supply (+5V)
- Signal Pin – Used for controlling the motor’s angle.
Servo motors are popular for their ability to rotate precisely within a range of 0 to 180 degrees, making them ideal for applications like robotic arms, RC cars, and gimbals.
L293D Motor Shield
The L293D Motor Shield is an add-on board for Arduino that facilitates the control of motors.
It includes dedicated ports for Servo Motor 1 and Servo Motor 2, which correspond to pins 9 and 10 on the Arduino UNO. It also provides:
- Power supply pins (Vcc and GND)
- Signal connections for servo control
By mounting the shield onto the Arduino UNO, these connections are established automatically, streamlining your project’s setup.
Interfacing the Servo Motor with the L293D Motor Shield
Hardware Setup
- Connect the servo motor’s GND, Vcc, and Signal Pin to the Servo Motor 1 or Servo Motor 2 port on the L293D shield.
- Securely attach the motor shield to the Arduino UNO to link the servo signal pins to their designated Arduino pins.
Programming Arduino for Servo Motor Control
Arduino’s built-in Servo library makes it easy to control servo motors without requiring additional motor libraries like Adafruit Motor Shield.
Key Functions in the Servo Library
The Servo library provides methods to initialize and control servo motors effectively:
1. Attach the Servo Object
Servo myservo;
myservo.attach(9); // Connects the servo to pin 9
This method also supports optional parameters to define the pulse width range (default: 544–2400 µs).
2. Detach the Servo Object
myservo.detach();
This releases the PWM pin for other uses.
3. Control Servo Position
- By Angle:
myservo.write(90); // Moves servo to 90 degrees - By Microseconds:
myservo.writeMicroseconds(1500); // Midpoint position
4. Read Servo Position
int currentAngle = myservo.read();
Example Code
The following program rotates the servo motor from 0 to 180 degrees and then back to 0 degrees in smooth increments:
#include <Servo.h>

Servo myservo;  // create a servo object to control a servo
const int servoPin = 10;
int pos = 0;  // variable to store the servo position

void setup(){
  // attach the servo on pin 10 to the servo object
  myservo.attach(servoPin);
}

void loop(){
  // sweep from 0 degrees to 180 degrees
  for(pos = 0; pos <= 180; pos += 1){
    myservo.write(pos);
    delay(15);
  }

  // sweep from 180 degrees to 0 degrees
  for(pos = 180; pos >= 0; pos -= 1){
    myservo.write(pos);
    delay(15);
  }
}
How It Works
Setup Phase:
The Servo object is created and attached to a specific pin on the Arduino.Loop Phase:
- The motor is instructed to move in a sweeping motion between 0° and 180°.
- Delays ensure smooth transitions between positions.
Control Flexibility:
By modifying the code, you can adjust the speed, range, and functionality of the servo motor.
Video Demonstration
Below is a demonstration of how to control a Hobby Servo Motor using the L293D Motor Shield and Arduino. Watch to understand the practical application of the steps explained above.
Conclusion
In this tutorial, we demonstrated how to interface and control a Hobby Servo Motor using the L293D Motor Shield and Arduino. The combination of the shield and the Servo library provides a user-friendly way to implement motor control in your projects.
Whether you are working on a robotic arm, an RC car, or any project requiring precise motor control, this setup is a versatile and reliable solution.
Further Reading
By mastering the use of motor shields and servo motors, you can take your robotics and mechatronics projects to the next level!


